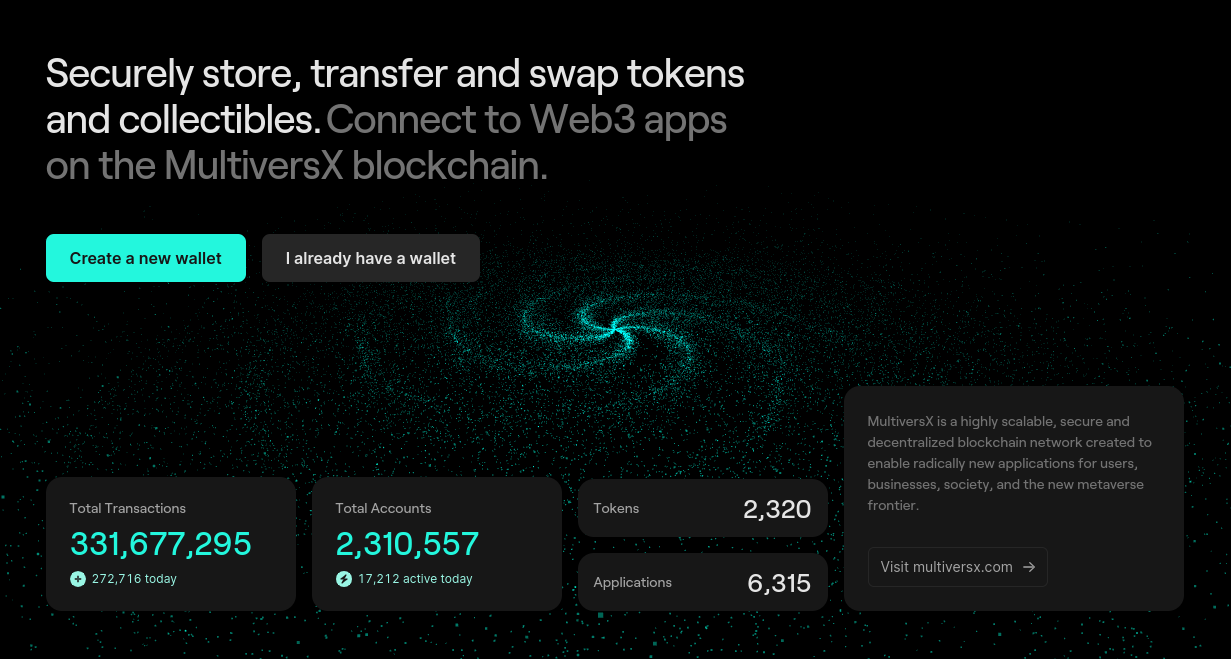
Web Wallet
Use the wallet to send, receive and store EGLD in a secure manner. Includes automations for interacting with staking products and ecosystem pools.
You can log in on the Web Wallet using a keystore file, using the xPortal App, using a Ledger device or a pem file. For now, we are going to create a keystore wallet and connect on the Web Wallet using it.
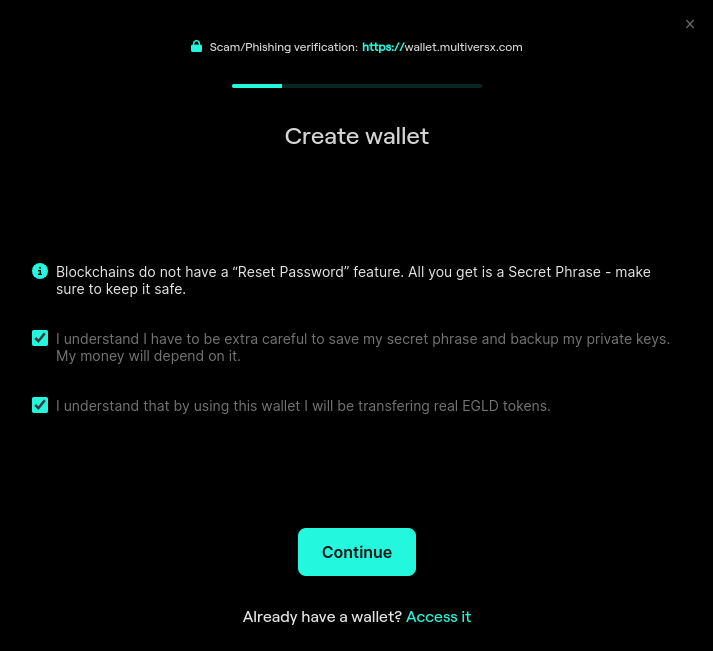
Create a new wallet
Go to https://wallet.multiversx.com & carefully acknowledge the instructions provided.
Click on "Create a new wallet":
Carefully read and acknowledge the information, then click "Continue".
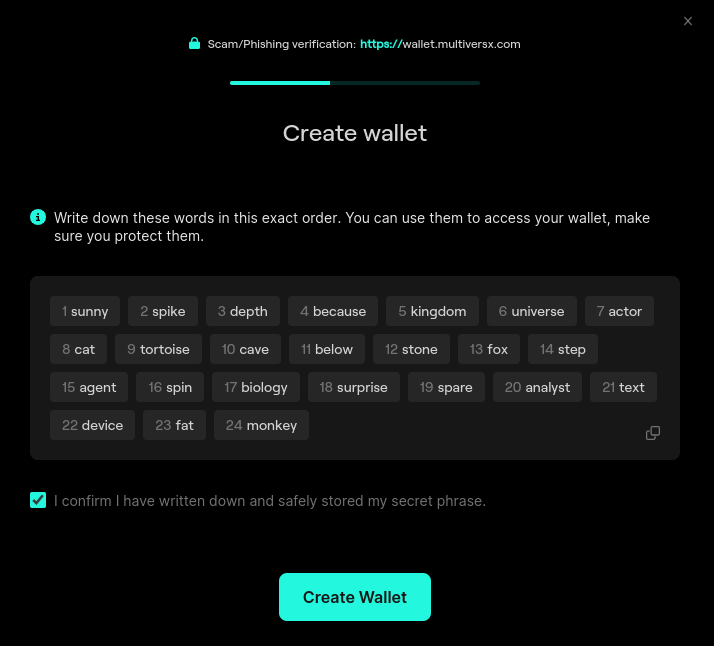
Save your secret phrase! This is very important.
The words, numbered in order, are your Secret Phrase. They are just displayed on your screen once and not saved on a server or anywhere in the world. You only get one chance to save them - please do so now.
Click the “copy” (two rectangles) button and then paste them into a text file. If your pets don’t usually find important pieces of paper to be delicious, you could even write the words down.
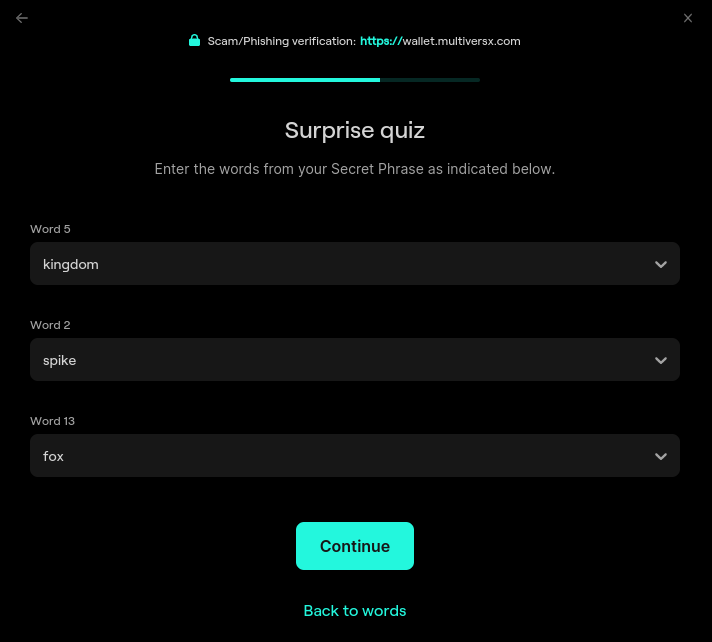
The next page is a test to see if you actually have saved the Secret Phrase. Enter the random words as indicated there and press "Continue".
You are one step away from getting your Keystore File. First, encrypt it with a password. Make sure it’s the strong kind, with 8 characters, at least one UPPER-CASE letter, a $ymb@l and numb3r.

In case you forget this password, you can get a new Keystore File with your secret phrase. Remembering it is always better.
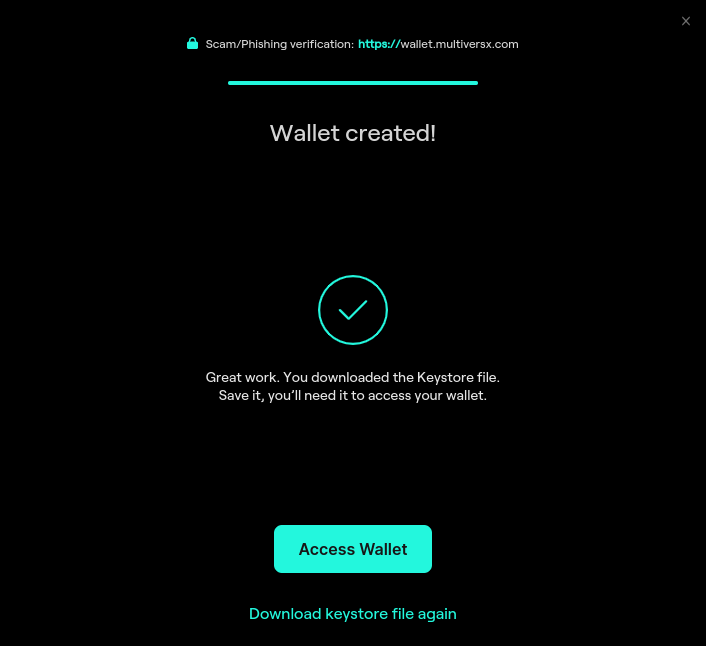
Congratulations, you have a new wallet! The associated Keystore File was downloaded to wherever your browser saves files by default. The file has the actual address of the wallet as default name, something like “erd….json”. You can rename it to “something.json” so it’s easier to manage, if you want.
Access a wallet
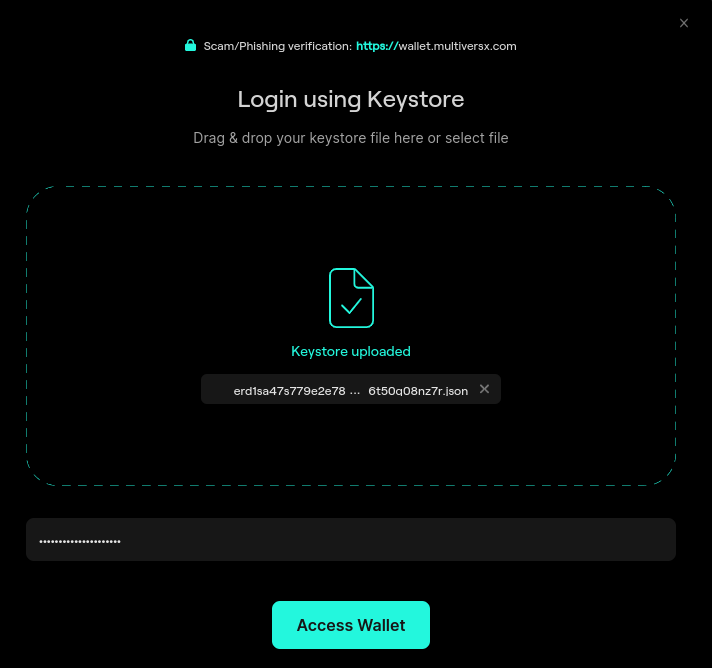
Go to https://wallet.multiversx.com/ and click on "Access Existing" Make sure the “Keystore file” access method is selected, click Browse and locate your Keystore File [erd1… .json], then put in your password and click "Access Wallet".
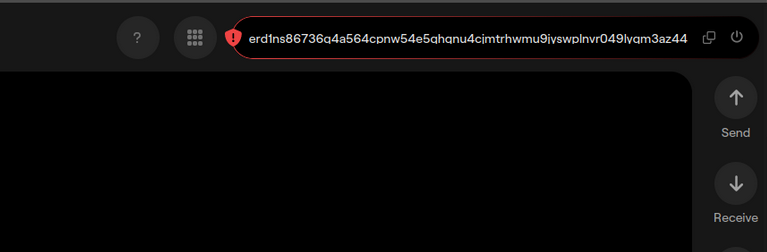
And you’re in! Your EGLD address is on top, you can use the “copy” button (the two rectangles) to copy it to the clipboard.
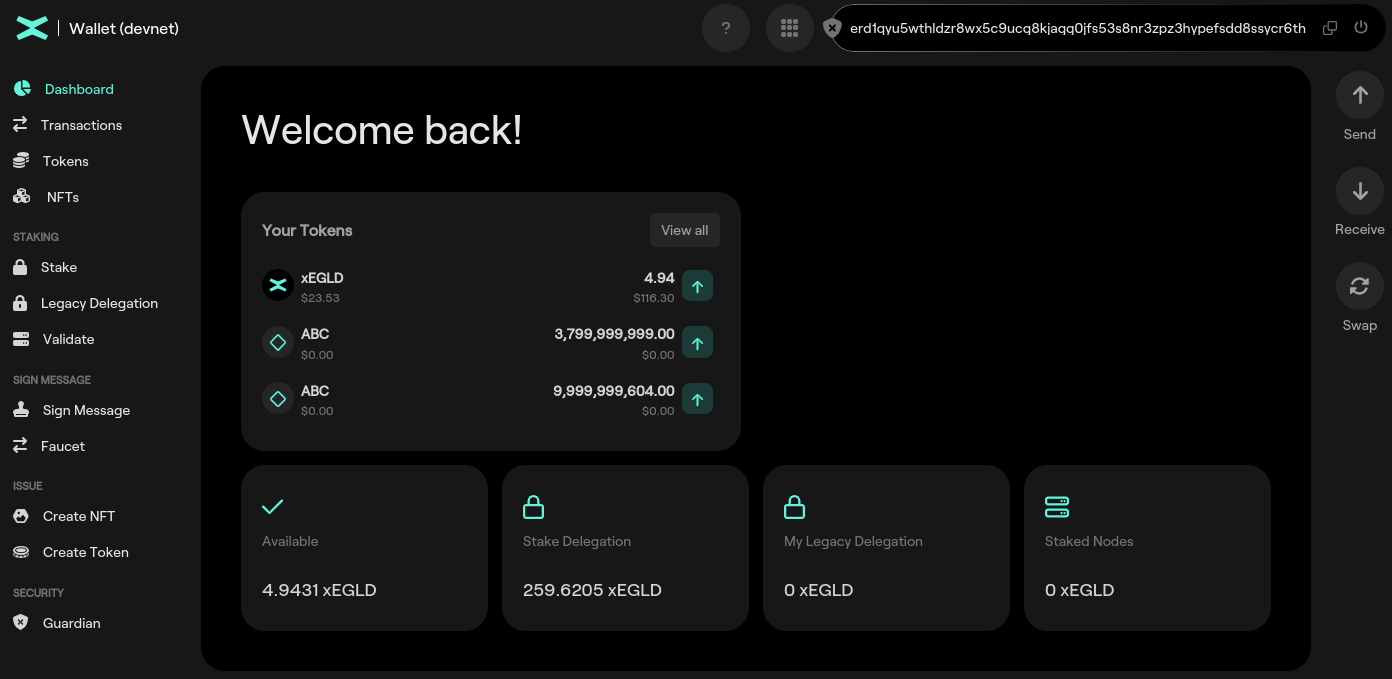
Overview of your EGLD balance
After logging into your wallet, your EGLD balances are immediately visible and displayed in easy to follow boxes.

- Available: Freely transferable EGLD balance
- Stake Delegation: Amount of EGLD delegated towards a Staking Services provider
- Legacy Delegation: Amount of EGLD delegated towards MultiversX Community Delegation
- Staked Nodes: Amount of EGLD locked for your staked nodes
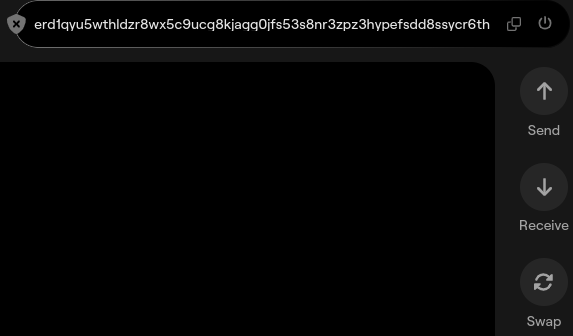
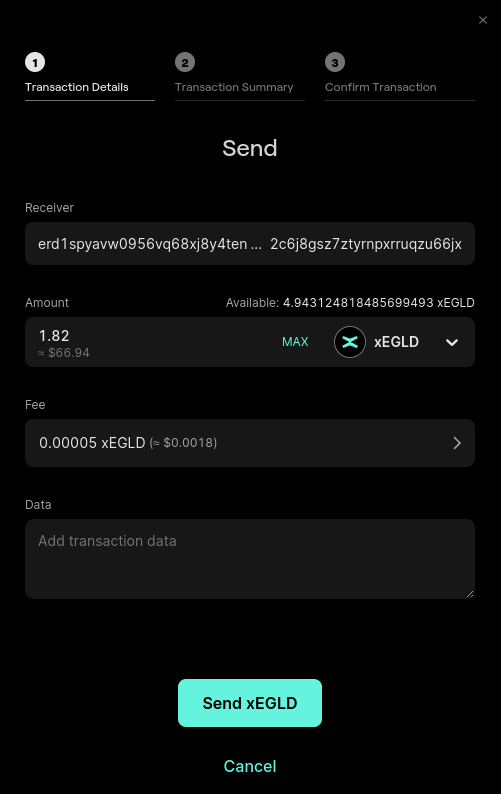
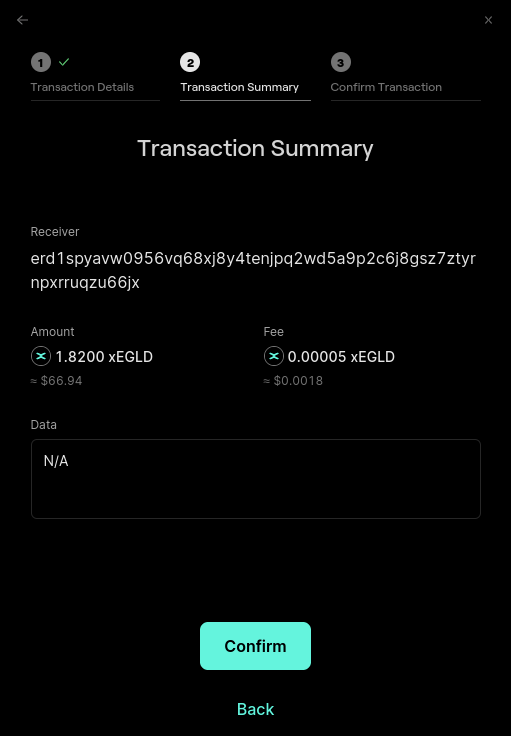
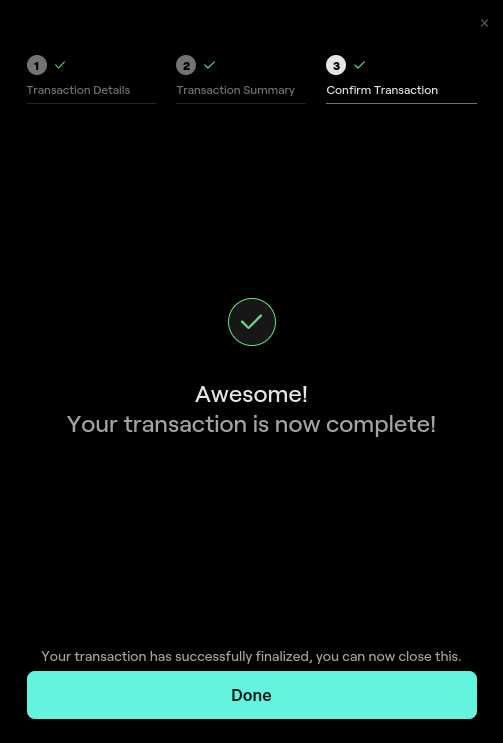
Send a transaction
Click "Send" on the right-hand section of the wallet:
Input the destination address & amount, and then click "Send".
Verify the destination and amount and click "Confirm".
After confirming the transaction you can see the progress and completion of the transaction.
You can always review your transaction history in the "Transactions" menu on the left-hand side of the wallet.
![]()
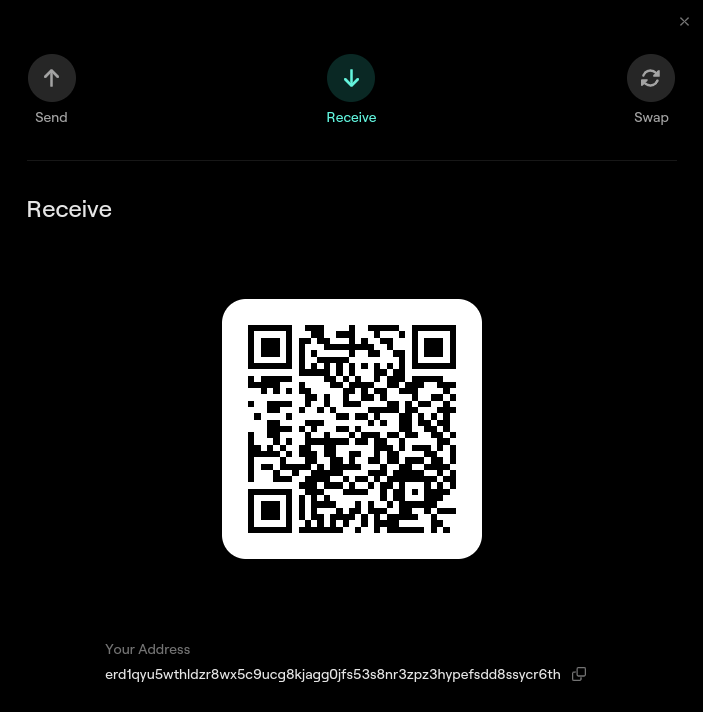
Receiving EGLD in your wallet
After logging into your wallet, as described above, you will be able to see your wallet address and share it with others, so they can send you EGLD.
Your address is immediately visible on the top part of the wallet. You can copy the address by pressing the copy button (two overlapping squares).
You can also click "Receive" on the right-hand side to see a QR code for the address, which can be scanned to reveal the public address.
Testnet and Devnet faucet
You can request test tokens from Testnet Wallet or Devnet Wallet in the Faucet tab.
The faucet is only available once in a given time period. Other alternatives for getting test tokens are:
- request tokens on Telegram - Validators chat
- use a third-party faucet, such as https://r3d4.fr/faucet
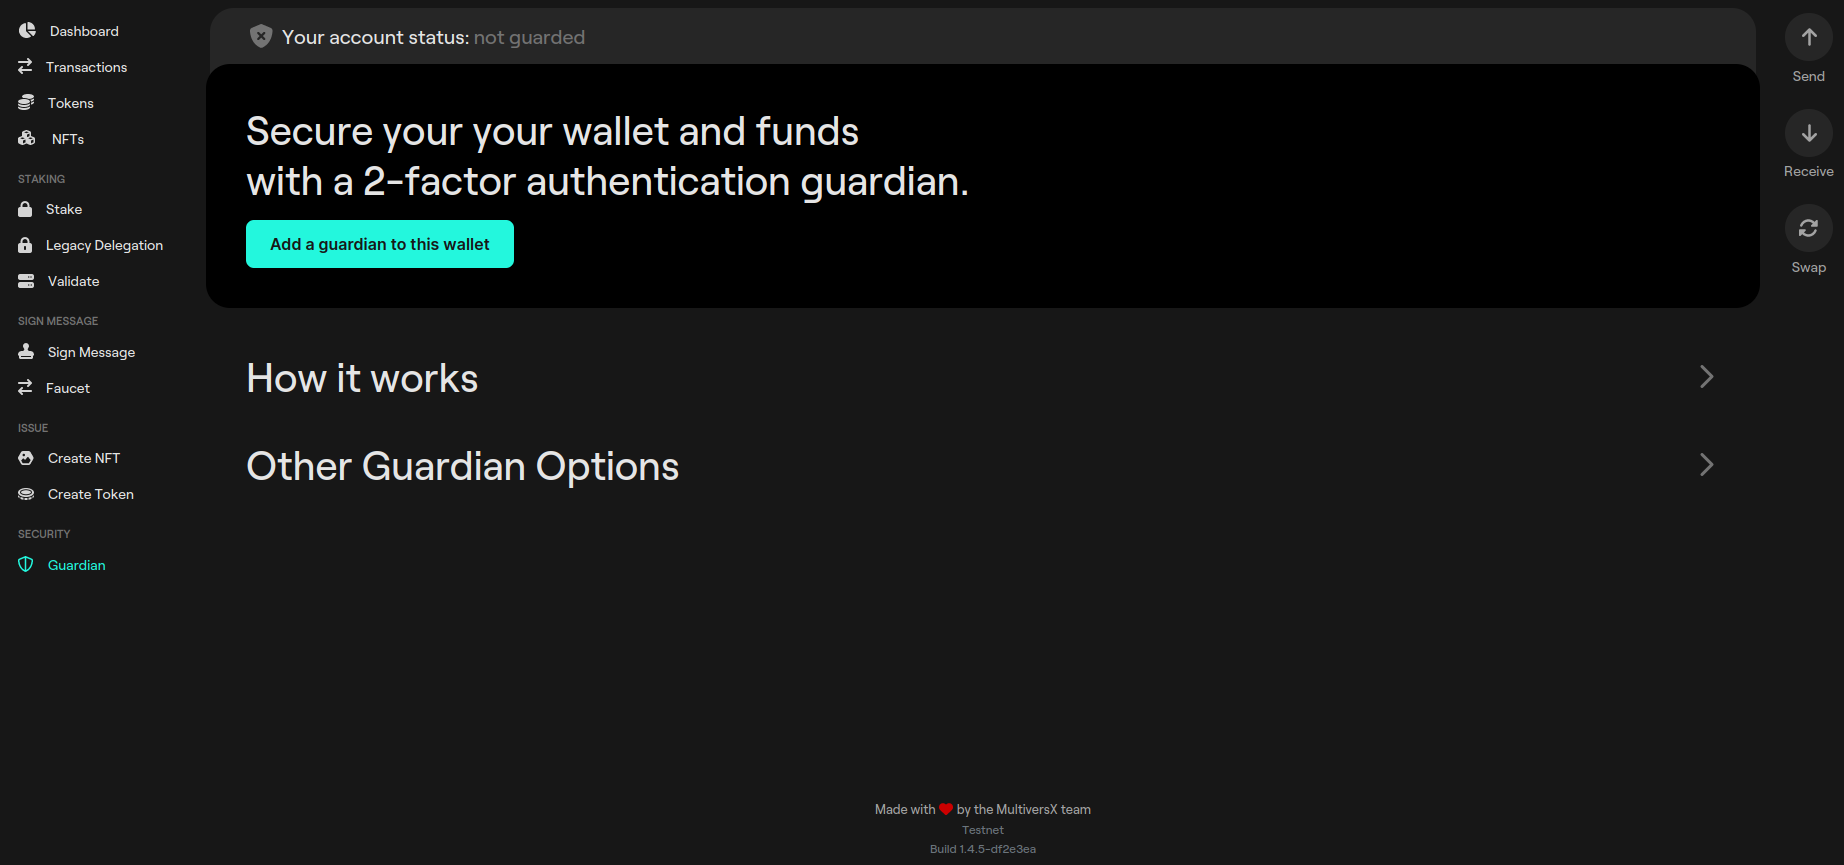
Guardian
Starting with Altair release, a new section for Guardian feature is available in the wallet interface:
Registering the Guardian
The initial step involves registering your guardian. To begin, access the wallet menu and select the Guardian feature. From there, you should have the option to register and set it up.
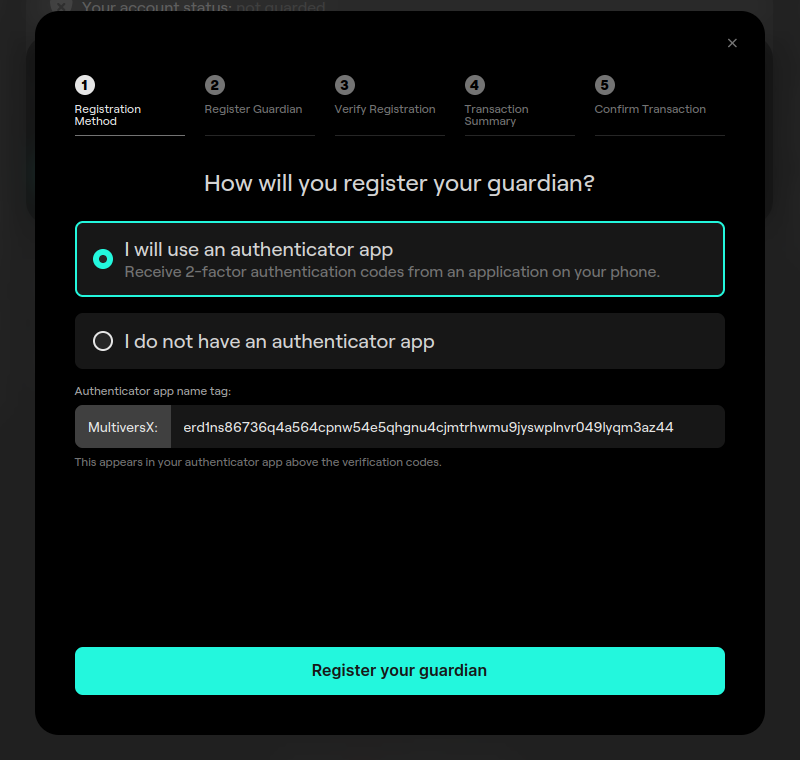
To establish a Guardian, you will need to utilize an authenticator app that is capable of generating two-factor authentication (2FA) codes. This app will enable you to set up and manage the Guardian feature effectively.
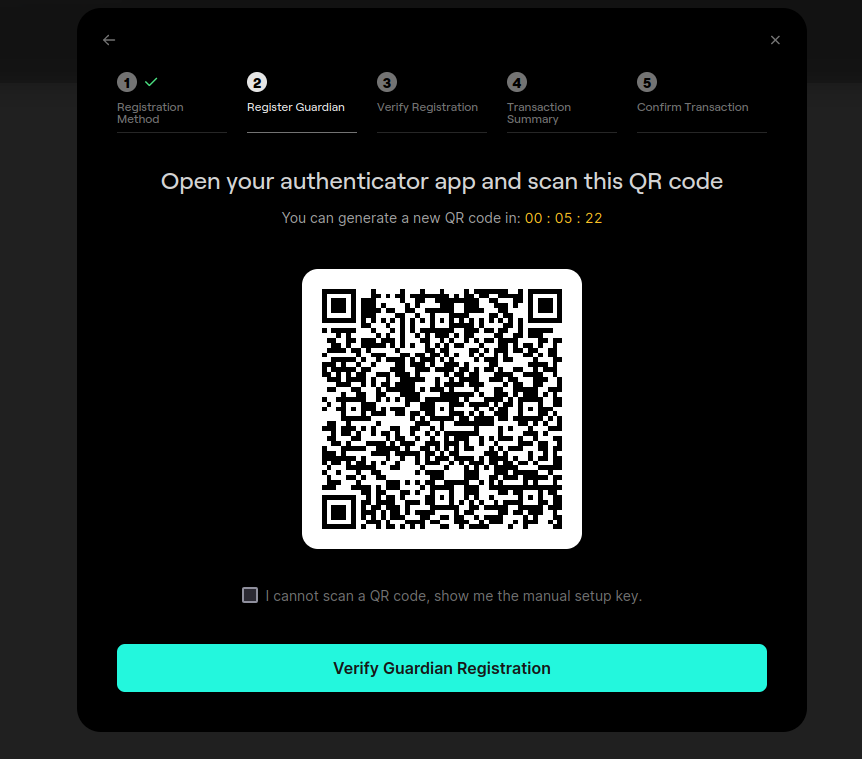
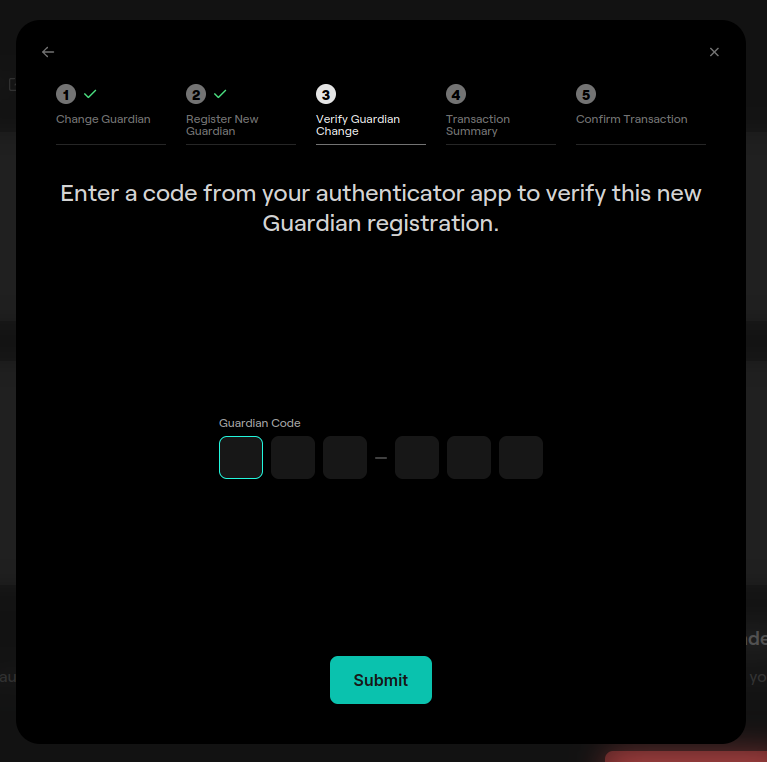
Please use the Authenticator app name tag to assign a recognizable label within the authenticator app, which will help you locate it easily when searching in the app. Once you have installed the authenticator app, scan the provided QR code using the app and enter the Guardian Code into the designated fields (refer to the below image).
If this is the first time when you are doing the registration, you don't have to select the I cannot scan a QR code, show me the manual setup key.
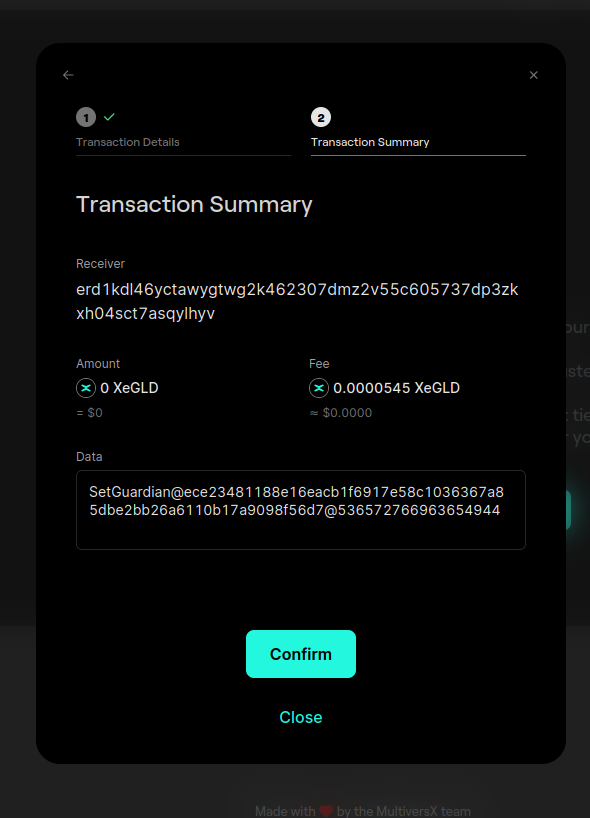
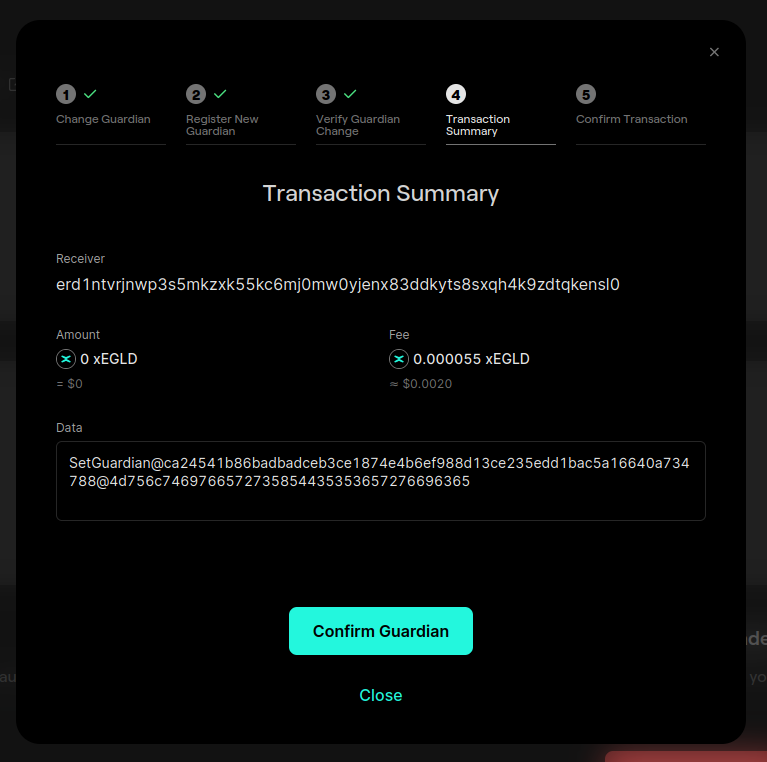
Check & Confirm the transaction:
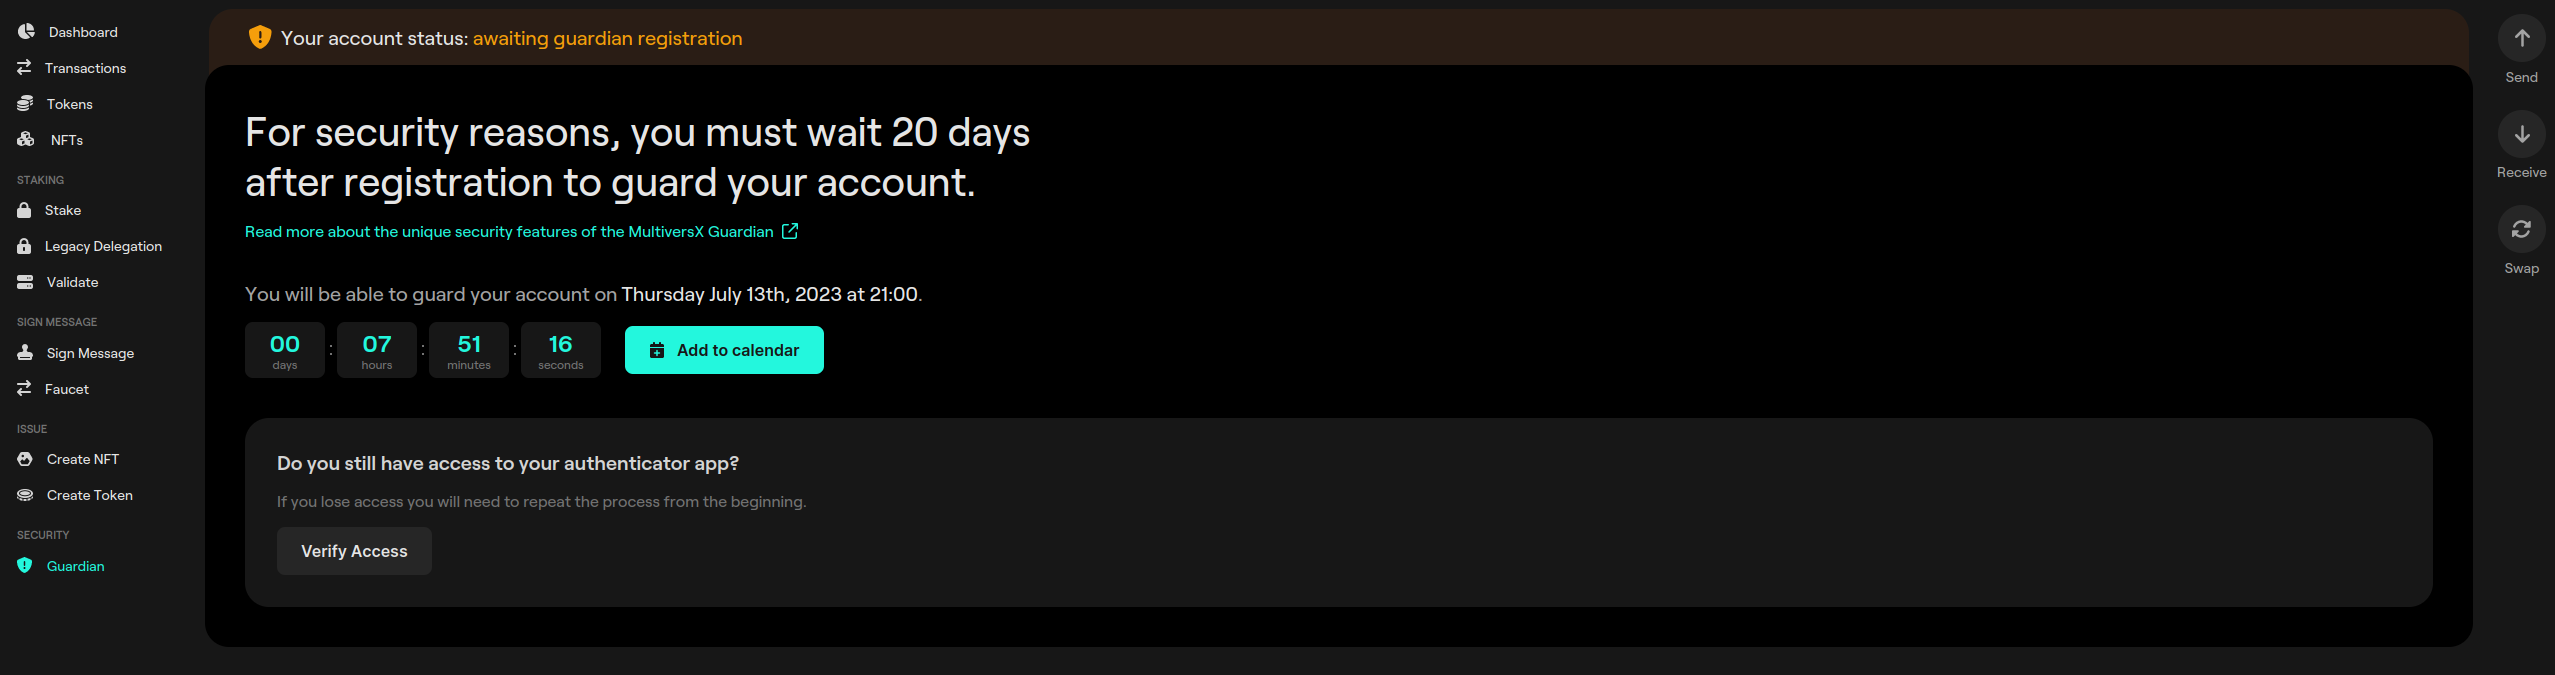
Activation period
After successfully completing all the previously mentioned steps, you will need to wait for the registration period to conclude. For the Mainnet, this registration period will extend over a duration of 20 epochs.
During the waiting period for your Guardian to become active, all interactions with the blockchain will continue to function as usual. There should be no noticeable changes or differences in the way transactions are processed.
Verify Access
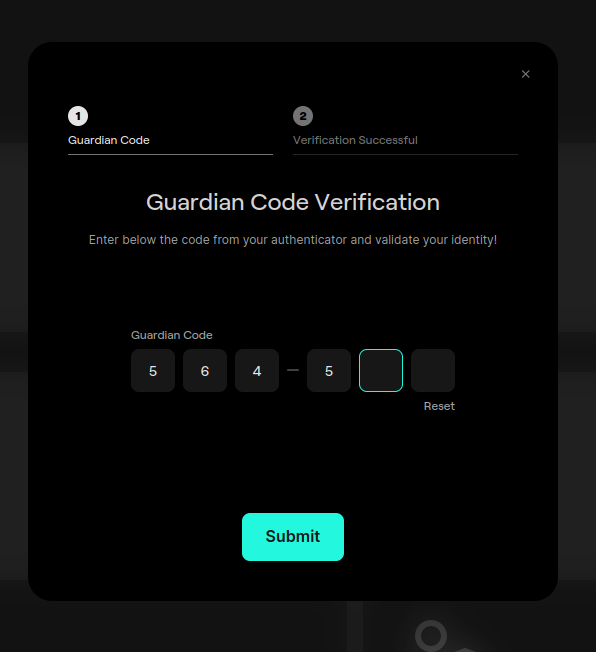
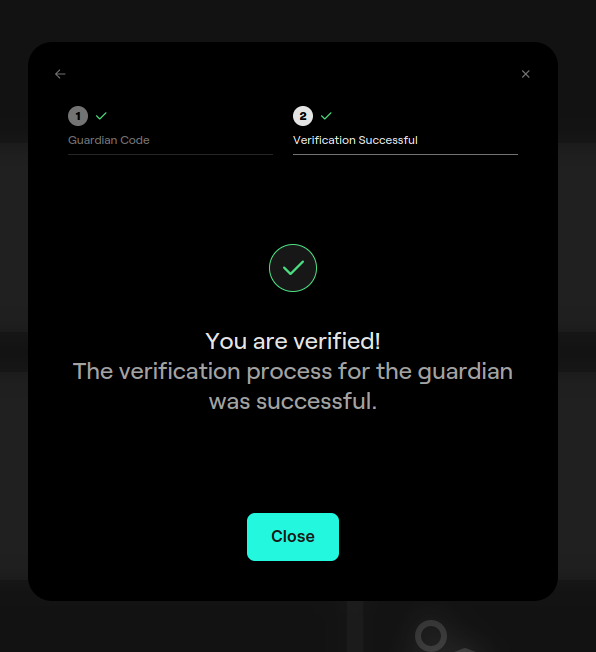
As depicted in the above-presented picture, you have the possibility to check if you still have access to your authenticator app by clicking the Verify Access button.
If you still have access to the correct authenticator app, you will receive a success message indicating that the activation process is complete. In such a case, you will not need to repeat the entire registration process from the beginning once the activation period is over.
In the event that you lose access to the authenticator app, you will be required to go through the entire process again by clicking on "Change Guardian" and following all the aforementioned steps, starting with the registration of the Guardian. This means you will need to repeat the steps described earlier in order to set up the Guardian feature anew.
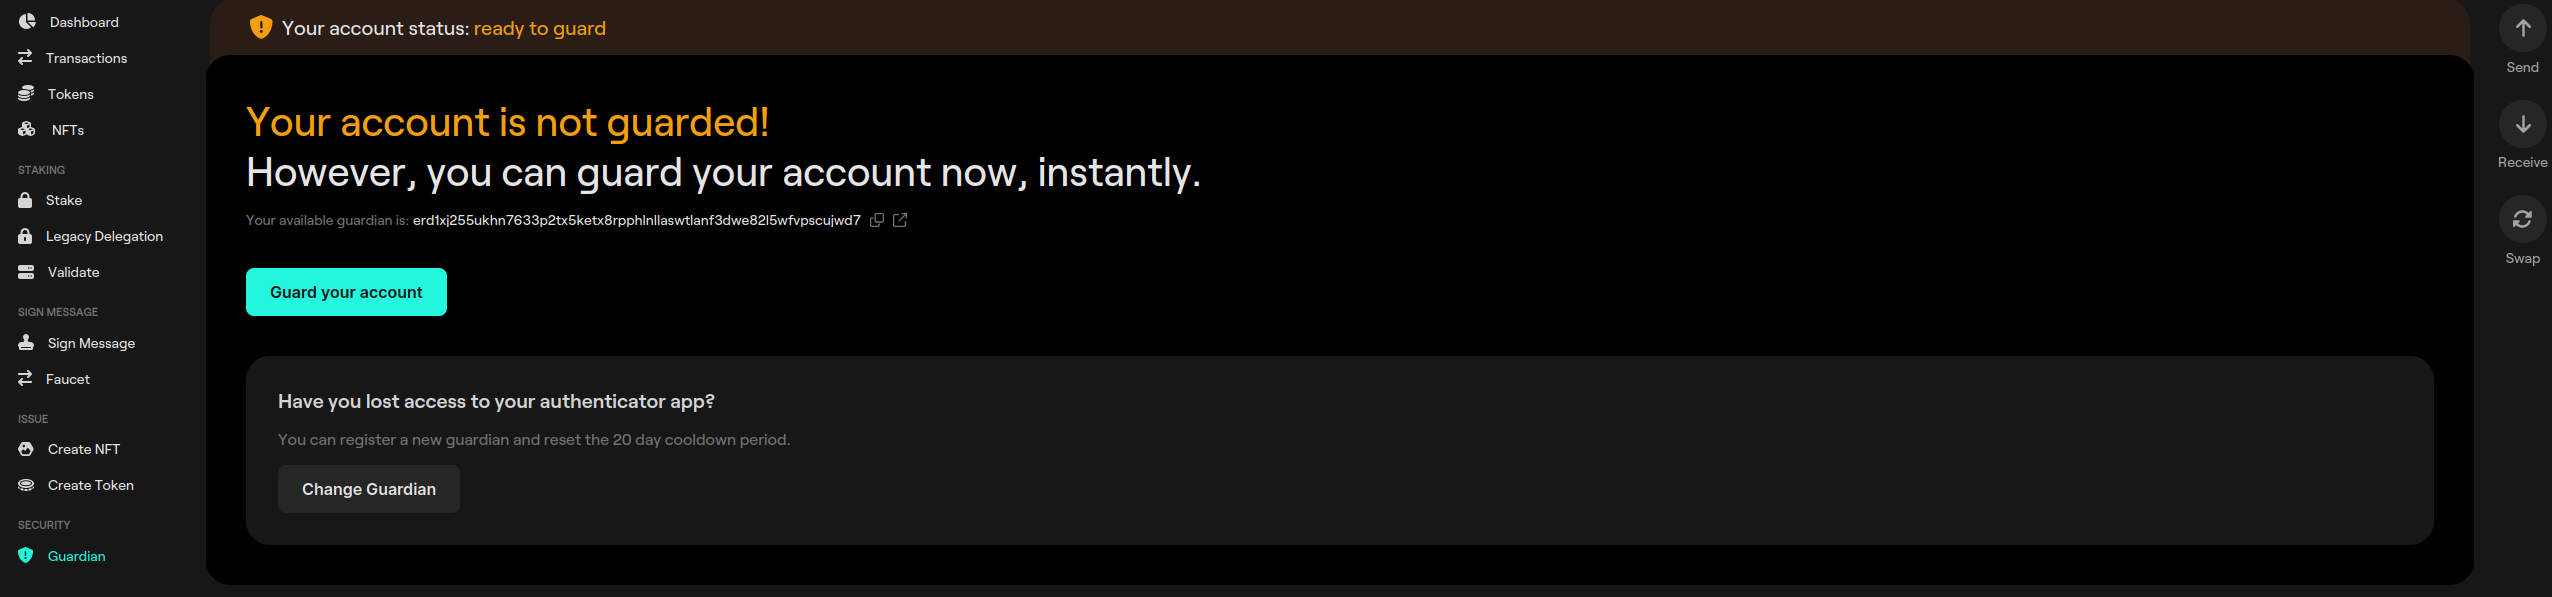
Guarding your account
Once the activation period has elapsed, you should find the option to "Guard your account" enabled, as indicated in the picture provided above. By clicing it, will enable the account guarding feature for your account.
In order to Guard your account, a normal GuardAccount self-transaction will be sent to the blockchain.
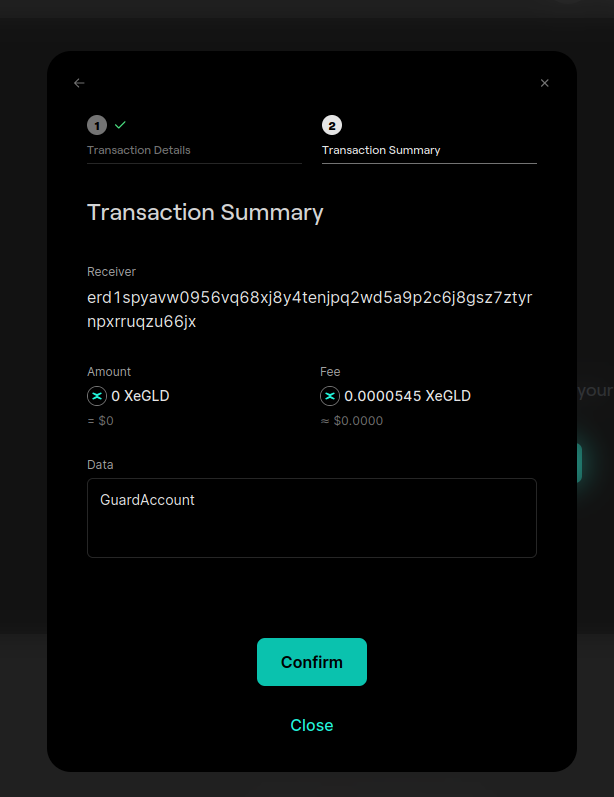
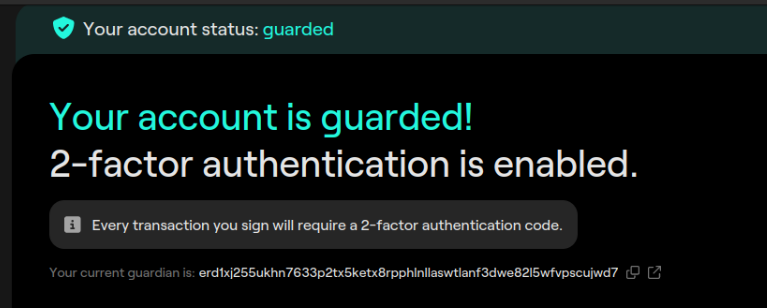
Upon the successful completion of a transaction, your account will be guarded, signifying that the account guardian feature is active. Congratulations! Your funds are now secure and protected.
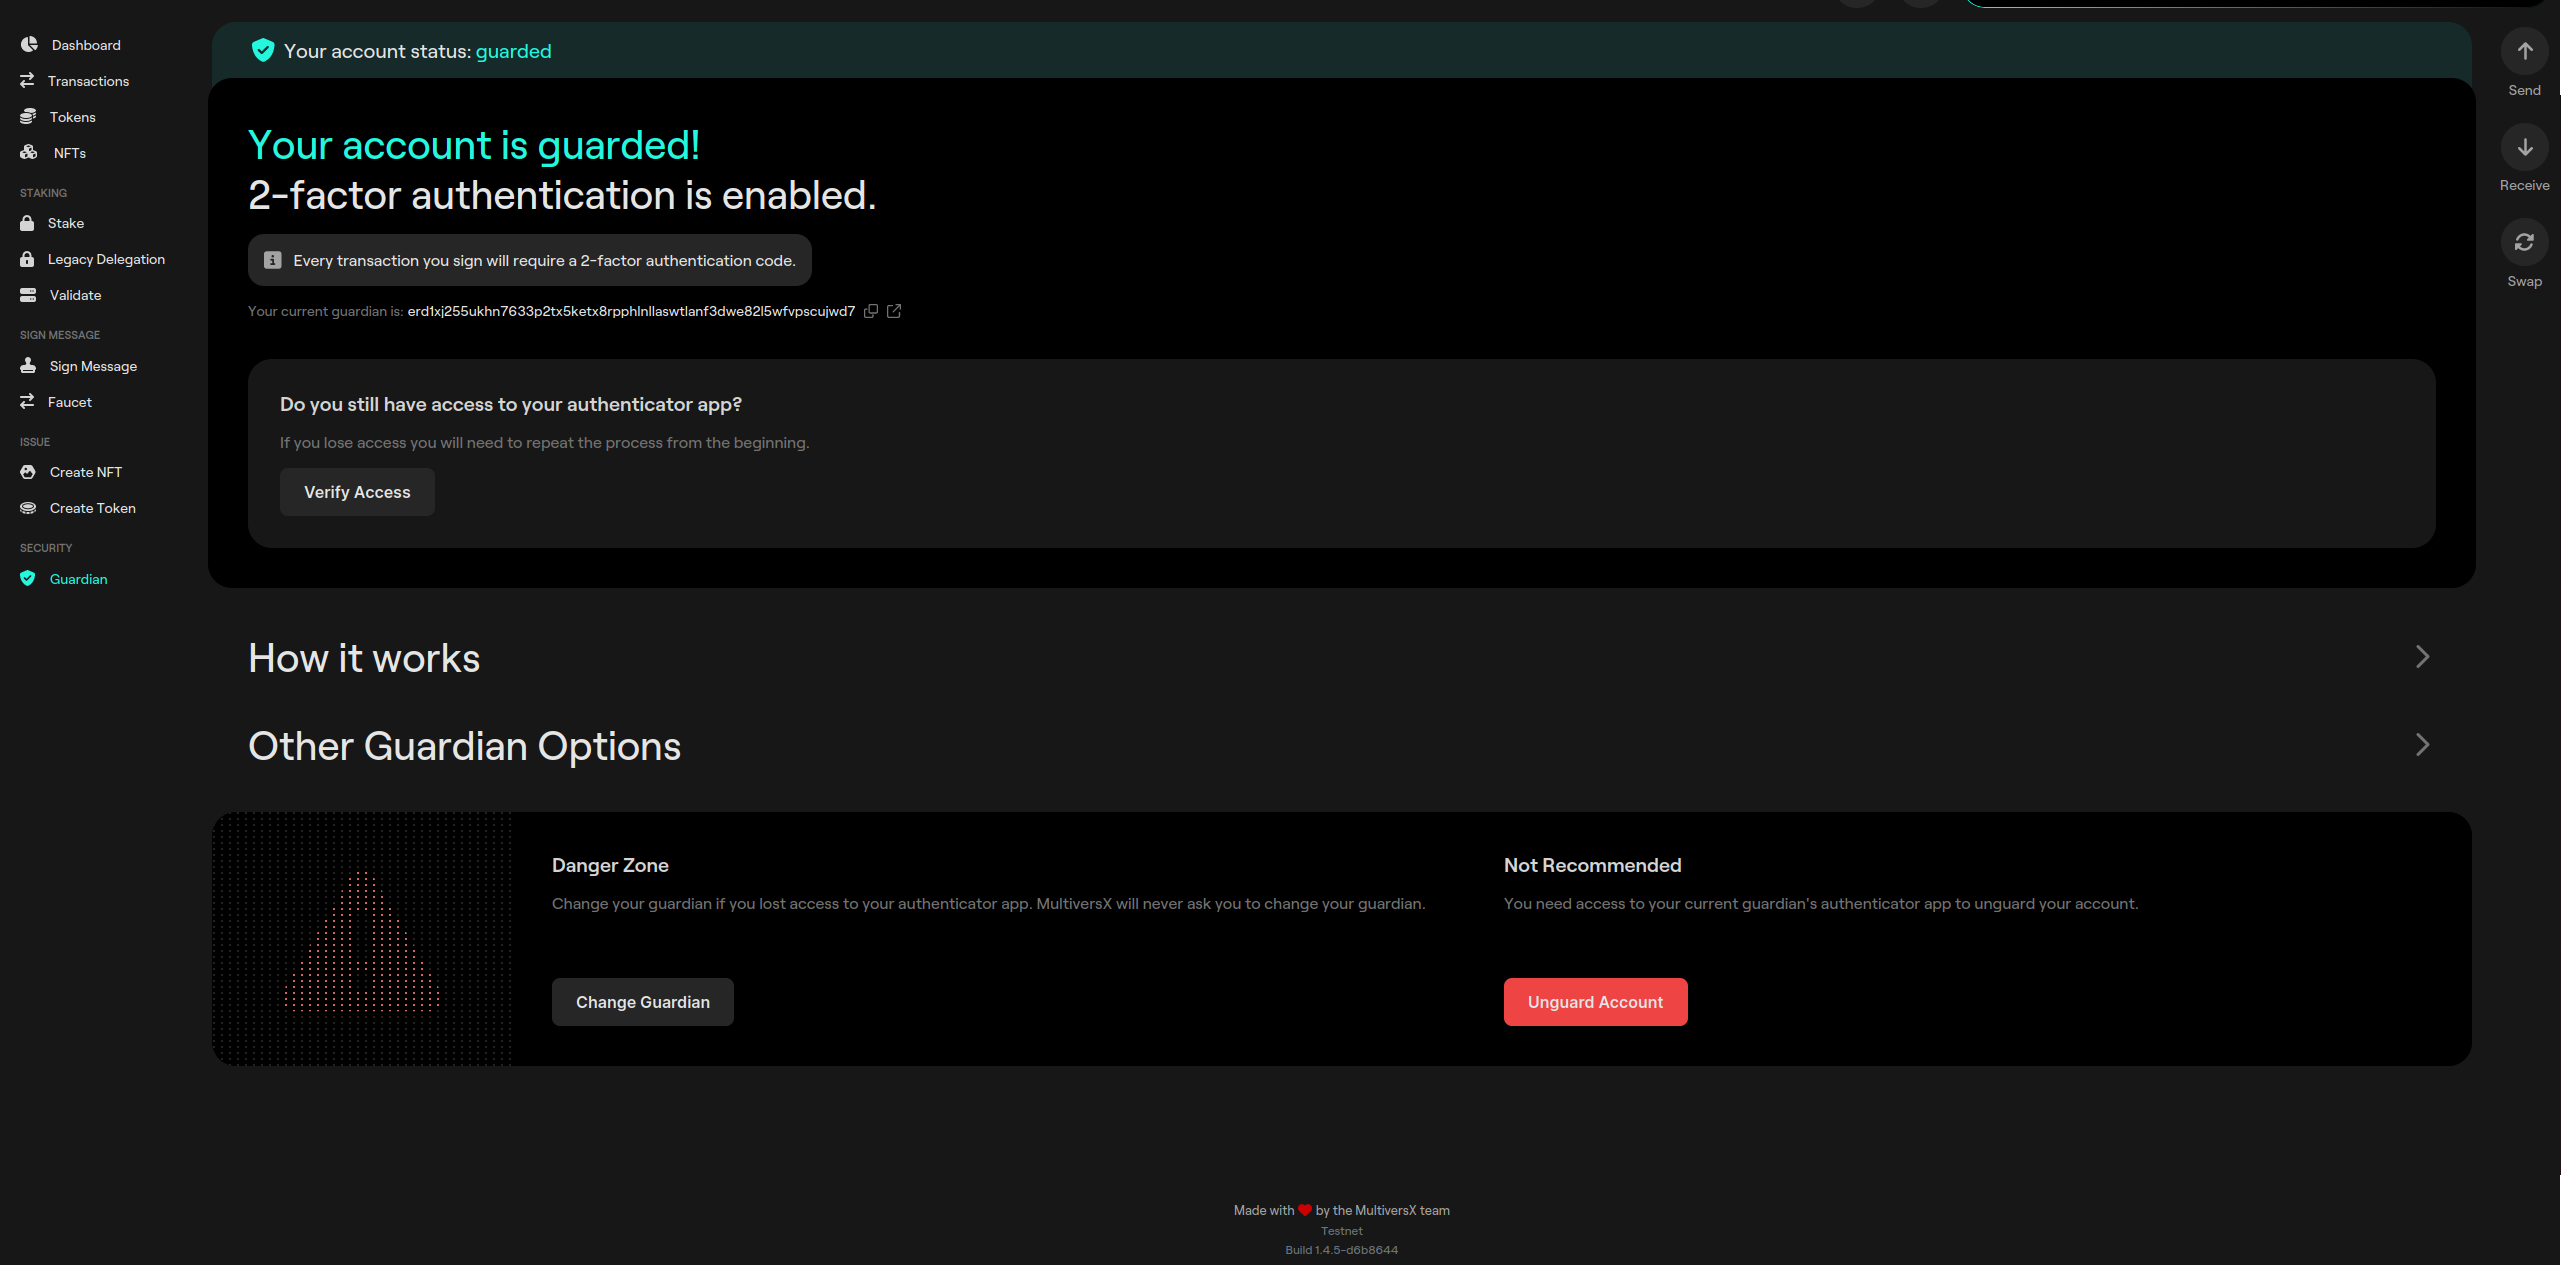
As depicted in the image, 3 new options are now available to the user.
New information has been added to the guardian dashboard.
Your current guardian is the guardian address. Once you enable the account guardian feature, any outgoing transaction initiated by this account will be considered a guarded transaction. This means that such transactions will require two signatures: one from the account owner, as before, and another from the account guardian, which is the address you can see here.
To obtain the guardian's signature for a transaction, you don't need to take any action. The TCS (Trusted Co-Signer Service - Guardian Service) will automatically provide the valid guardian signature for the user's transaction whenever a user with a guarded account sends a transaction from their wallet and provides a valid two-factor authentication (2FA) code. The wallet manages the interaction with the TCS, so the user only needs to enter a valid 2FA code.
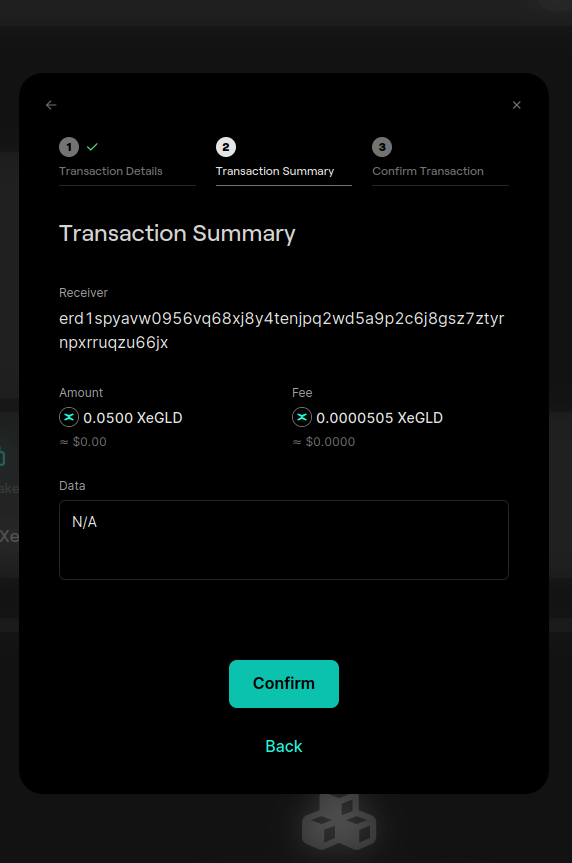
Sending a guarded transaction
Once you have set a guardian and initiated the GuardAccount transaction, all subsequent transactions must be guarded to be validated by the blockchain. This means that you must enter the 2FA code in order to proceed with these transactions when using the web-wallet.
Let's take for example a simple eGLD transfer transaction:

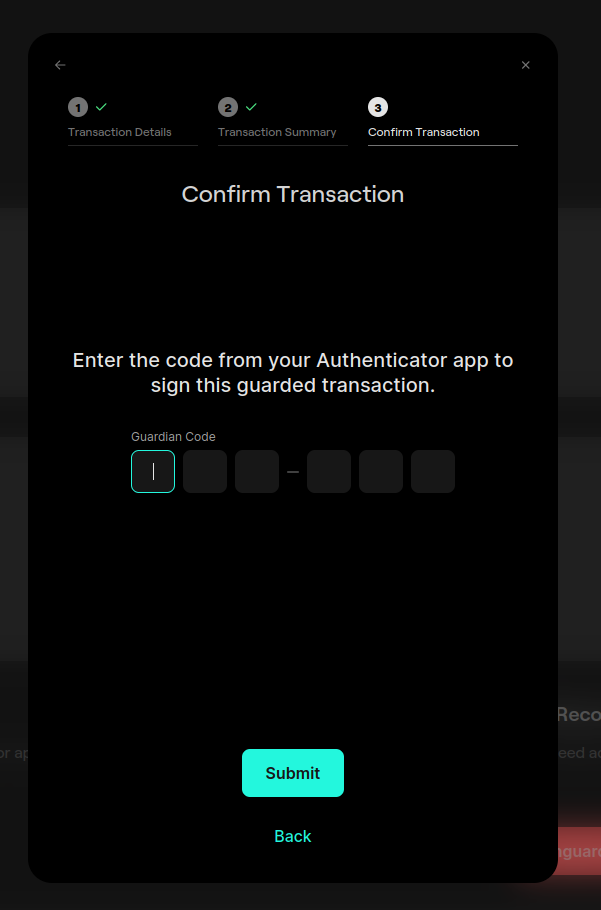
Confirm the transaction:
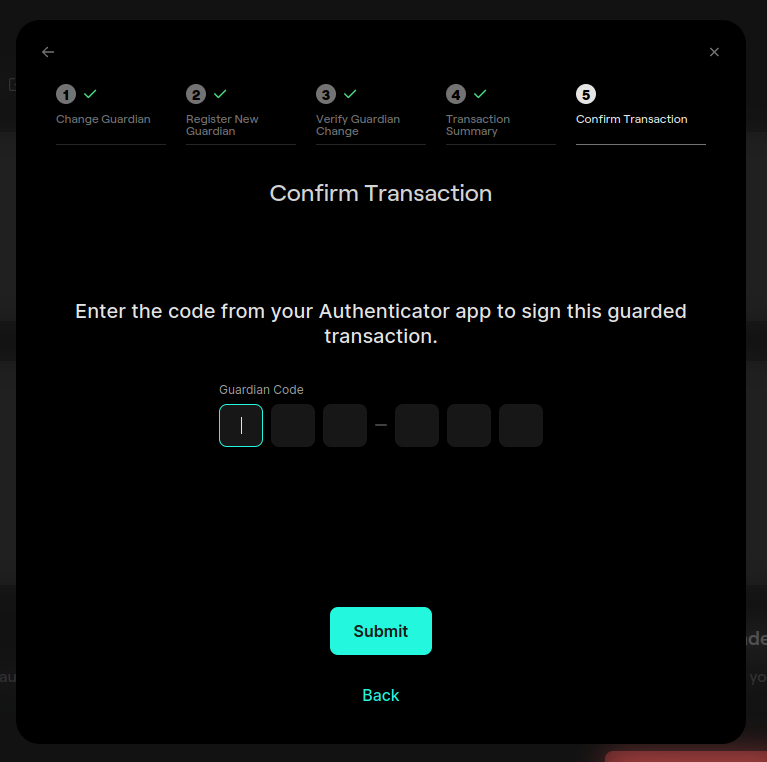
In the last step, you will need to check your authenticator tool to retrieve the Guardian code (2FA code) and enter it for verification. See picture below:
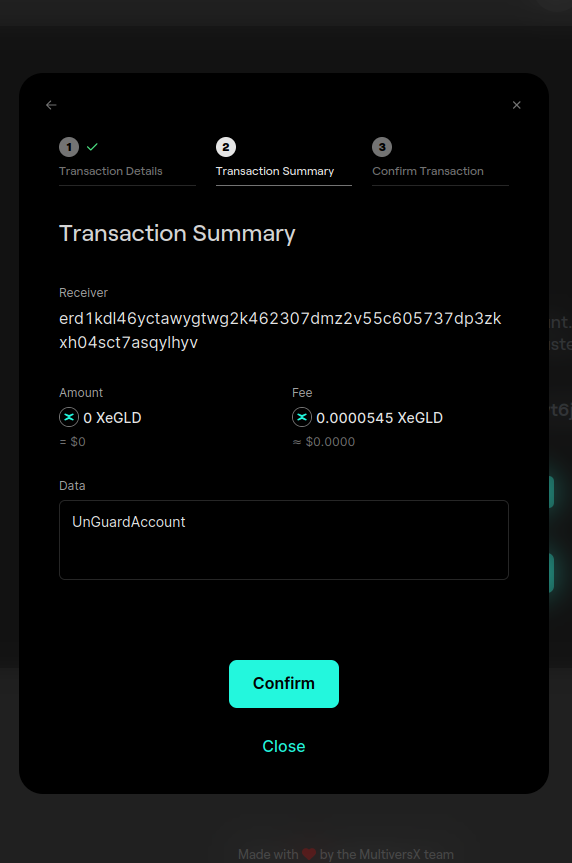
Unguarding your account
Unguarding your account consists of sending a guarded UnGuardAccount transaction to your own address. You can do it by simply using the Unguard Account button from the Guardian section:
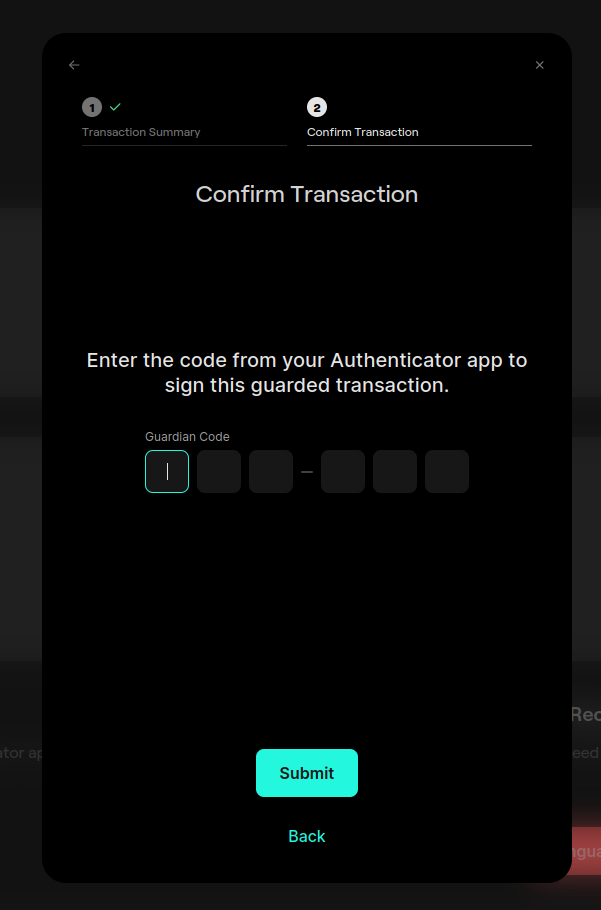
And confirming the transaction after checking the validity of it:
And validating it via the authenticator app:
Due to the transaction being guarded, there is no cooldown period required. The transaction will be processed instantly without any delay.
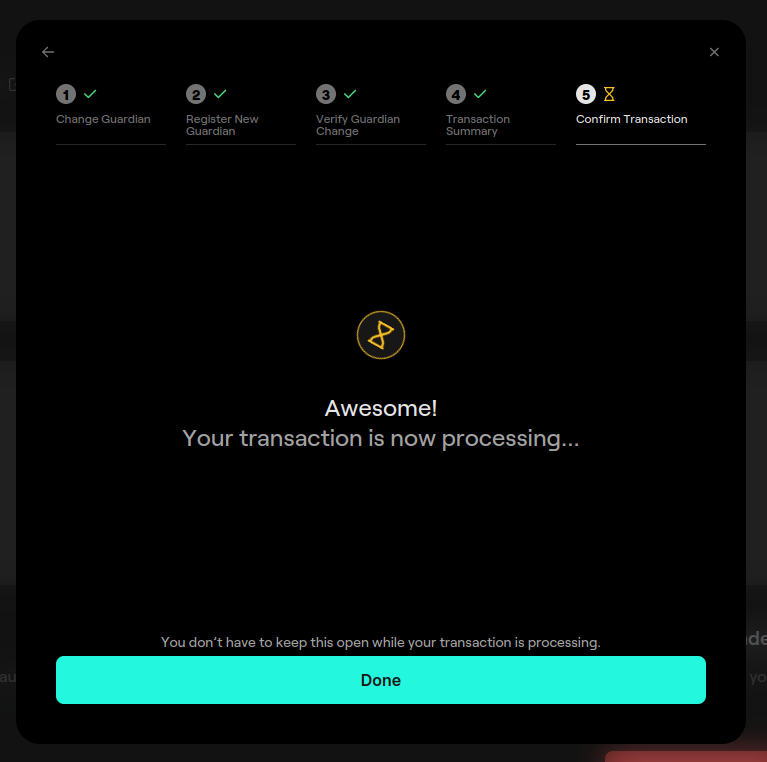
Changing your guardian
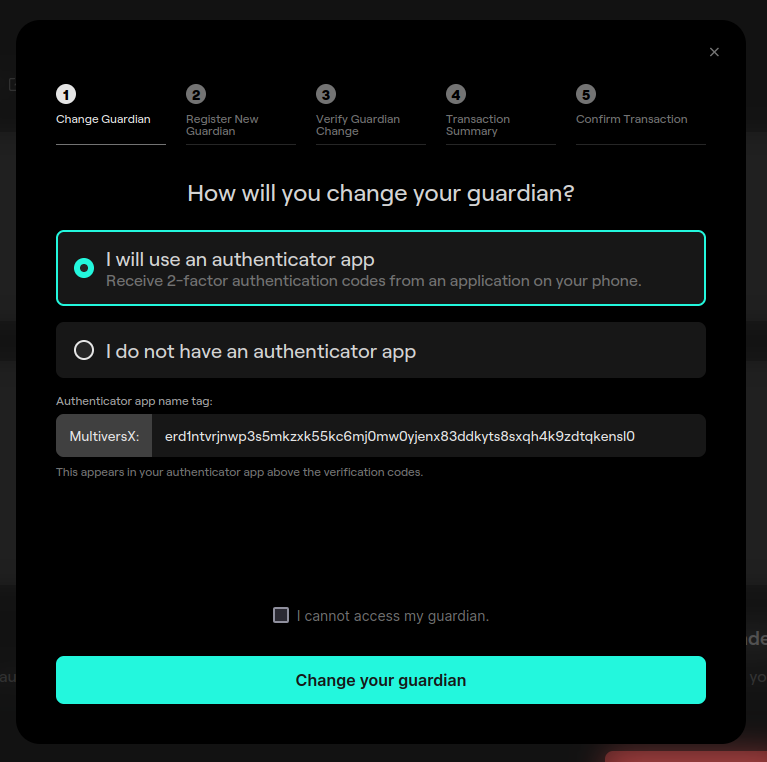
The Guardians feature allows you to change your guardian in situations where you suspect your account has been compromised or if you have lost access to your Authenticator.
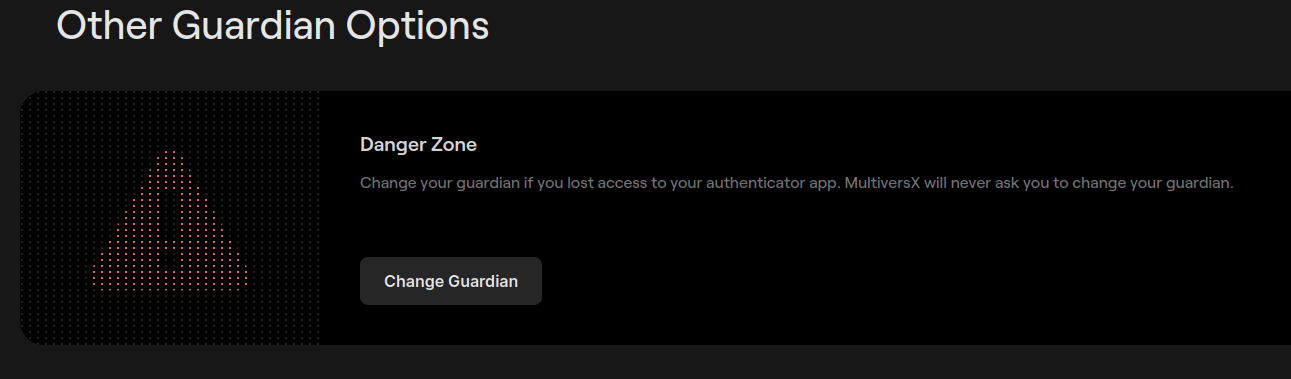
This can be achieved by clicking th Change Guardian button from the Guardian's main dashboard. Afterwards you will be faced with two options:
Changing guardian with 20 epochs pre-registration time
- If you have lost access to the authenticator app, you can address this issue by selecting the option "I cannot access my guardian" from the window mentioned below.
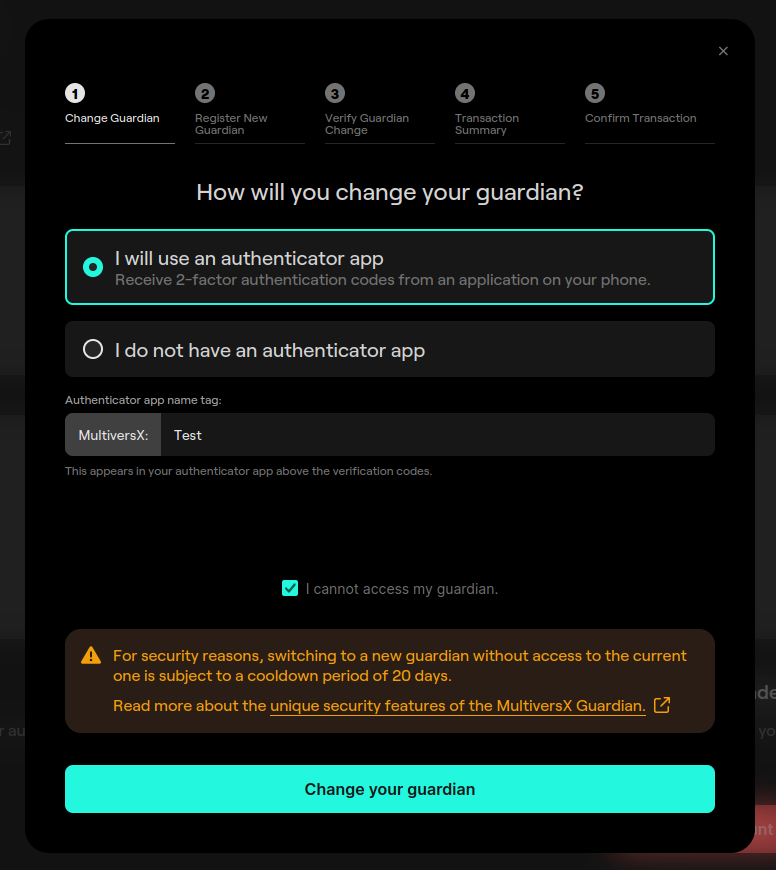
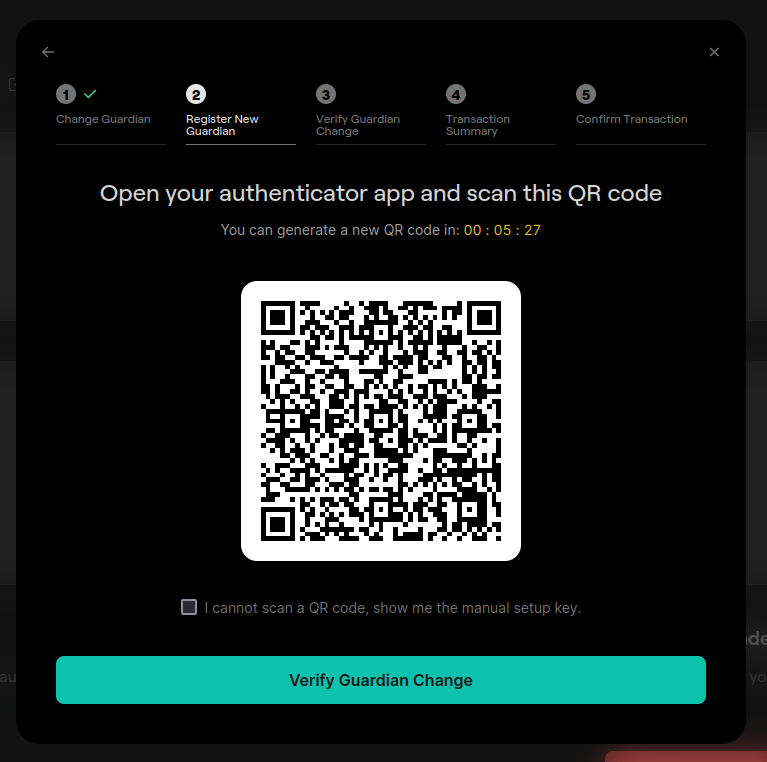
- And follow the normal guardian registration process of registering a new guardian:
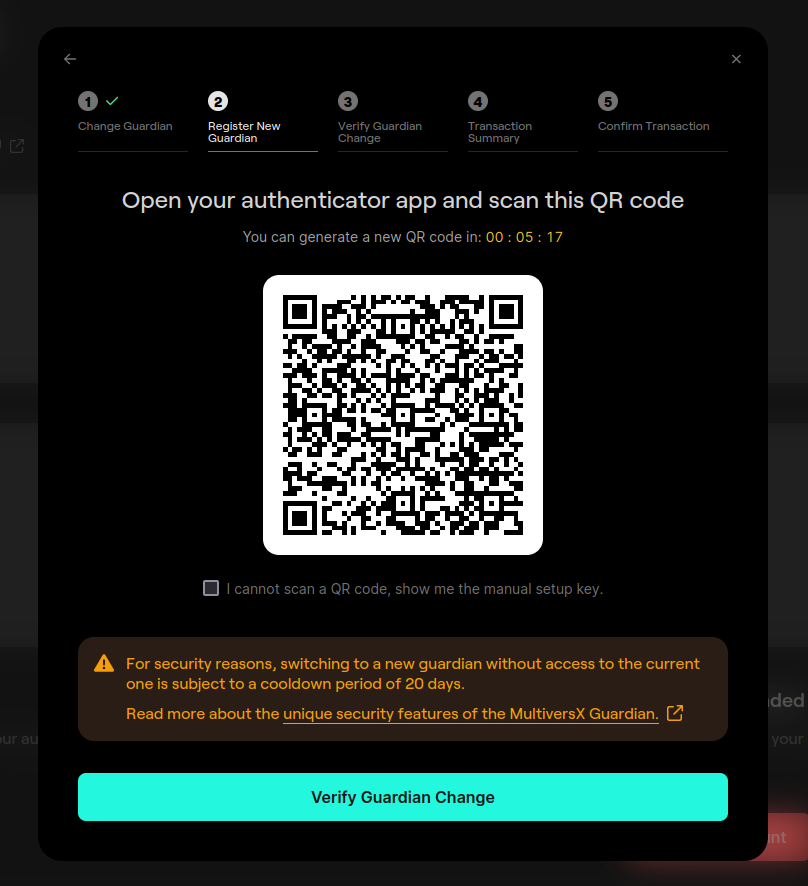
- Introduce the 2FA code provided by your Authenticator App for the new guardian:
The above described process will need 20 epochs for your Guardian to become active. If you did not lose access to the authenticator app there is no reason why you should proceed this way. If you will have a pending guardian for 20 epochs which was not registered by you it means that your account has been compromised and you must move your funds to a safe account.
It is important to be aware of certain indicators that indicate the necessity of changing your guardian. One such indicator is the presence of a red shield and frame, as depicted in the image below. This visual cue serves as a signal that prompts you to take action and investigate the situation of your account.
The Guardian Dashboard will signal the fact that you have an unconfirmed guardian change request:
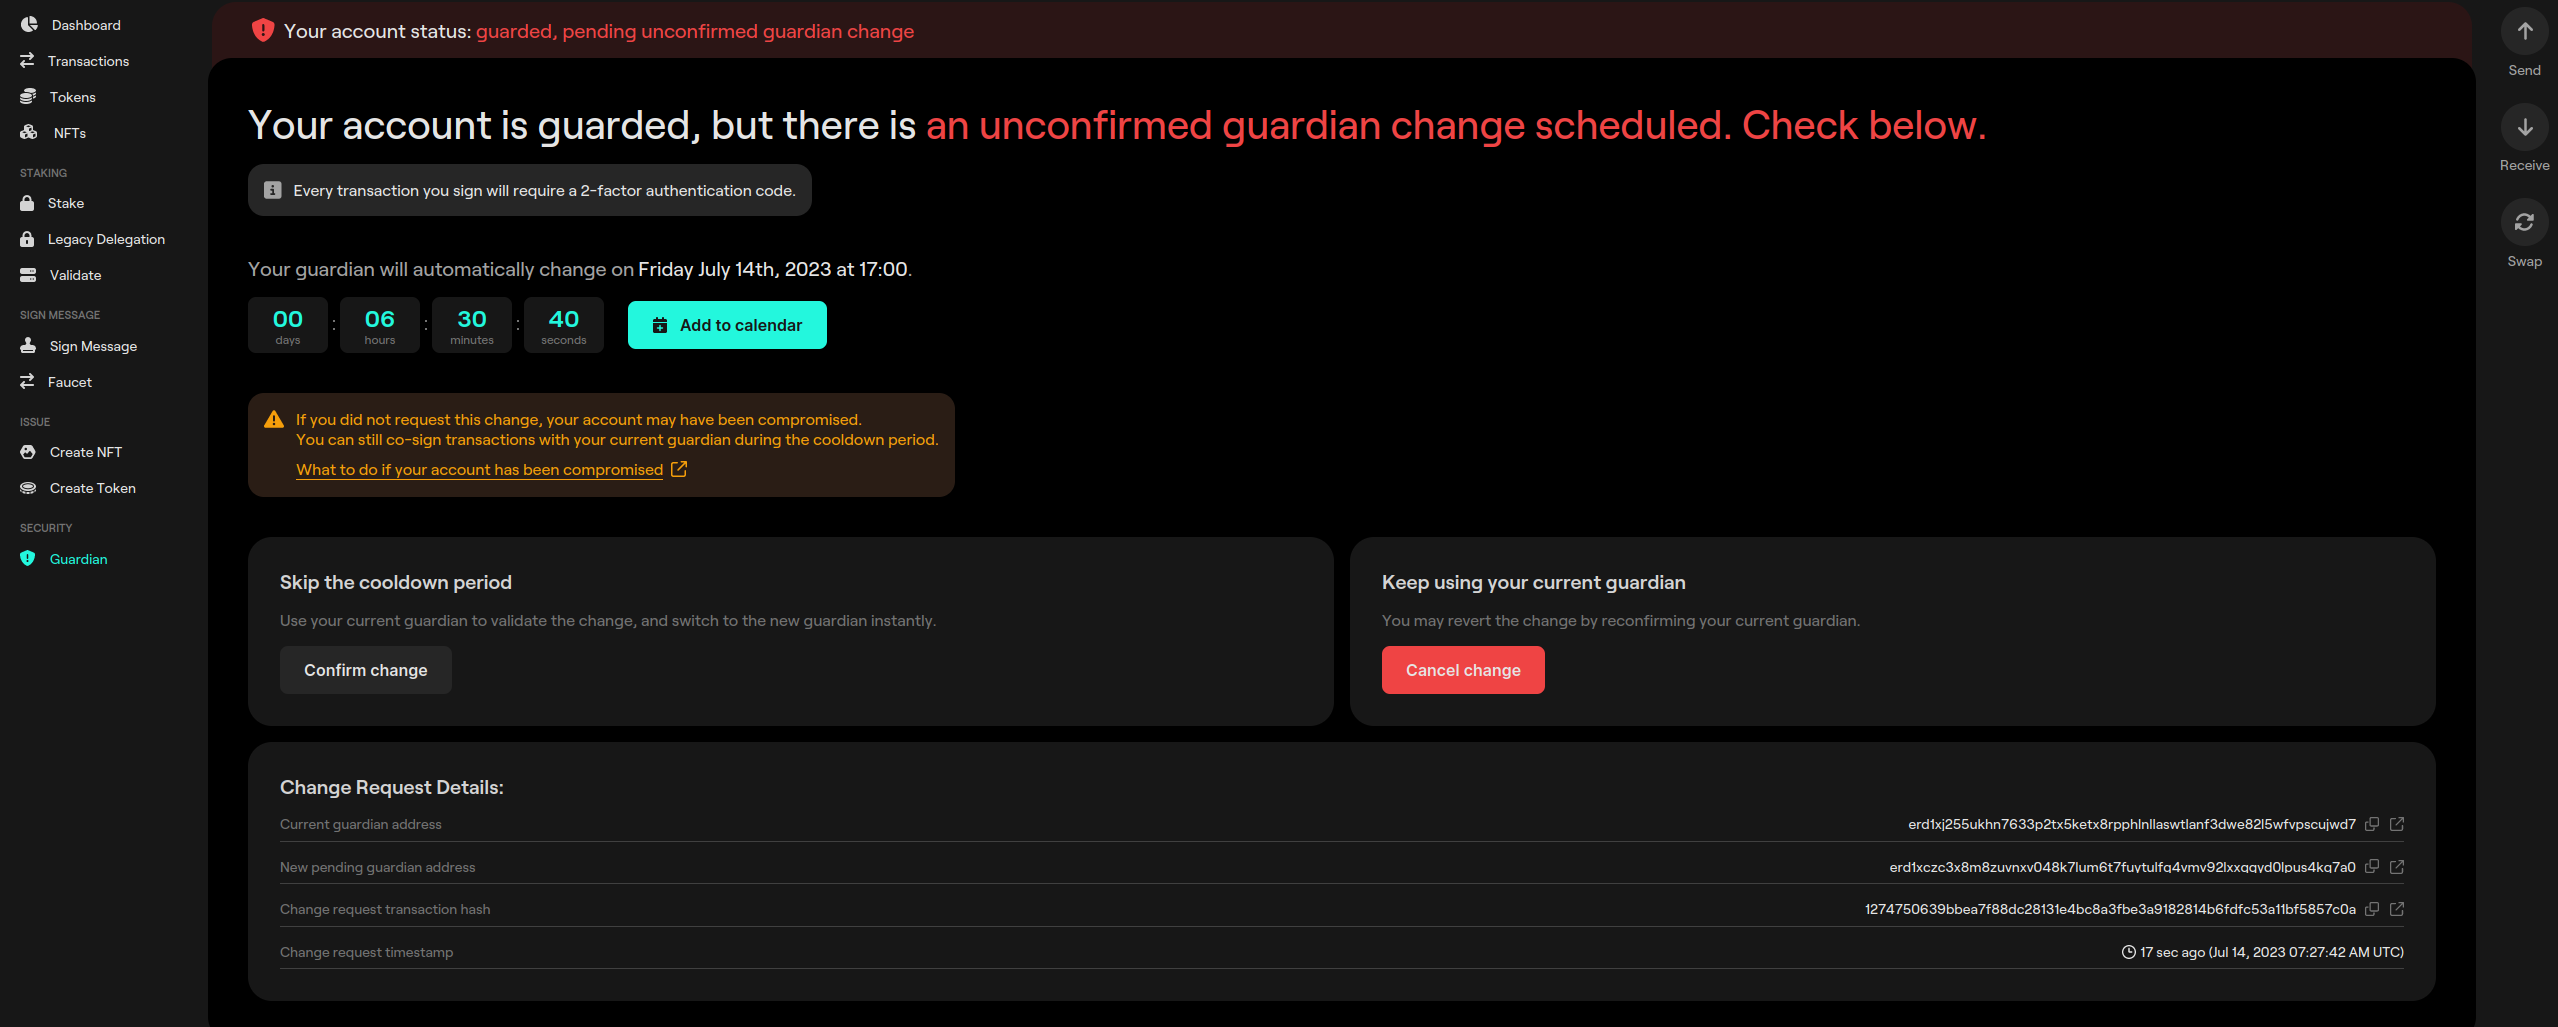
Showcasing the details of the request:

If you were the one who initiated the request to change the guardian and you still have access to the currently active guardian, you will encounter two additional options:
Skip the cooldown period by clicking the Confirm Change button: By selecting this option, you can proceed with the change of the guardian without waiting for the cooldown period to elapse.
Cancel the Guardian Change and continue using your current guardian by clicking the Cancel Change button: Choosing this option allows you to abort the guardian change process and maintain your existing guardian without any modifications.
Both of the actions will be done by sending a guarded SetGuardian self-transaction.
If it was not you the one triggering the change of the guardian, it may be the case that your account has been compromised and the scammer is trying to change the guardian to a new one, that he can control. Don't worry, he has to wait 20 epochs in order to have his own guardian becoming active. By then you can:
- move the funds to a different account, that you control, by using the still active guardian. In this case never Confirm Change.
- instantly cancel the pending guardian by using the Cancel Change, and play the "owning" game with the scammer. Not recommended.
We recommend the first solution. Even though you have your funds staked, the unbound period (10 epochs) is shorther than the guardian activation period so that you have enough time to unstake and safely move them to a safe account.
Instantly changing guardian
To instantly change your guardian you must use the Change Guardian. You must follow a different set of steps compared to the previous Change Guardian way:
- Use an authenticator app for registering the new guardian. You must have access to your already active guardian which means that you don't have to select "I cannot access my guardian" option.
- Open your authenticator app, scan the QR code and register your new guardian.
- Enter the 2FA code of the new guardian from the authenticator app.
- Check and Confirm the transaction.
- Enter the 2FA code of the guardian you want to change.
This is the 2FA code of your previous guardian that you have to enter, not the new guardian's one.
- Awesome! Wait for your transaction to be processed. From now on your account will be guarded by the new guardian that you recently registered.