Proxy architecture
Overview of the MultiversX Proxy
Introduction
The MultiversX Proxy acts as an entry point into the MultiversX Network, through a set of Observer Nodes, and (partly) abstracts away the particularities and complexity of sharding.
The Proxy is a project written in go, and it serves as foundation for gateway.multiversx.com.
The source code of the Proxy can be found here: mx-chain-proxy-go.
Architectural Overview
While any Node in the Network can accept Transaction requests, the Transactions are usually submitted to the Proxy application, which maintains a list of Nodes - Observers - to forward Transaction requests to - these Observers are selected in such manner that any Transaction submitted to them will be processed by the Network as soon and as efficiently as possible.
The Proxy will submit a Transaction on behalf of the user to the REST API of one of its listed Observers, selected for (a) being online at the moment and (b) being located within the Shard to which the Sender's Account belongs. After receiving the Transaction on its REST API, that specific Observer will propagate the Transaction throughout the Network, which will lead to its execution.
The Observer Nodes of the Proxy thus act as a default dedicated entry point into the Network.
It is worth repeating here, though, that submitting a Transaction through the Proxy is completely optional - any Node of the Network will accept Transactions to propagate, given it has not disabled its REST API.
Overview of the MultiversX Proxy
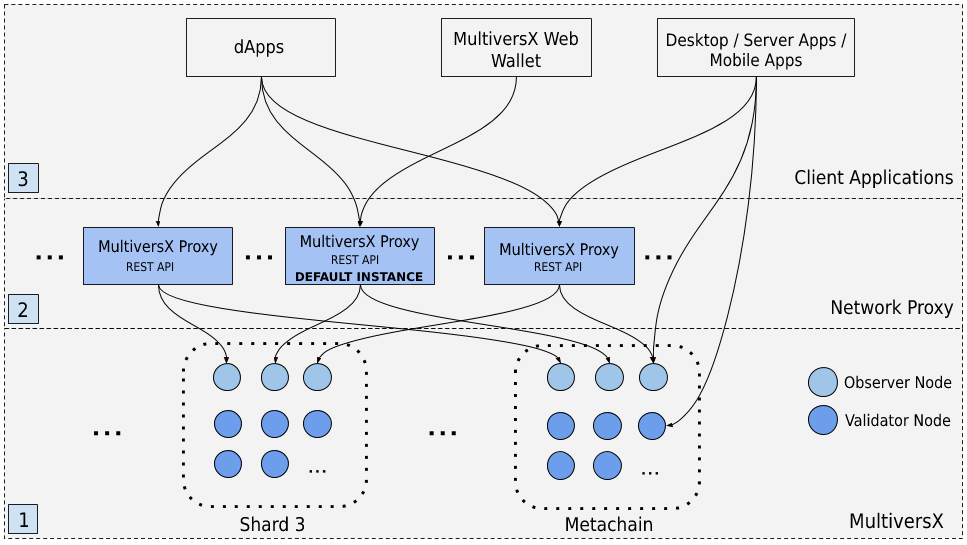
In the figure above:
- The MultiversX Network - consisting of Nodes grouped within Shards. Some of these Nodes are Observers.
- One or more instances of the MultiversX Proxy - including the official one - connect to Observer Nodes in order to forward incoming user Transactions to the Network and to query state within the Blockchain.
- The client applications connect to the Network through the MultiversX Proxy. It is also possible for a blockchain-powered application to talk directly to an Observer or even to a Validator.
Official MultiversX Proxy
The official instance of the MultiversX Proxy is located at https://gateway.multiversx.com.
Swagger docs
The Swagger docs of the proxy can be found at the root of the gateway. For example: https://gateway.multiversx.com.
Set up a Proxy Instance
Documentation for setting up a Proxy is preliminary and subject to change
In order to host a Proxy instance on a web server, one has to first clone and build the repository:
git clone https://github.com/multiversx/mx-chain-proxy-go.git
cd elrond-proxy-go/cmd/proxy
go build .
Configuration
The Proxy holds its configuration within the config folder:
config.toml- this is the main configuration file. It has to be adjusted so that the Proxy points to a list of chosen Observer Nodes.external.toml- this file holds configuration necessary to Proxy components that interact with external systems. An example of such an external system is Elasticsearch - currently, MultiversX Proxy requires an Elasticsearch instance to implement some of its functionality.apiConfig/credentials.toml- this file holds the configuration needed for enabling secured endpoints - only accessible by using BasicAuth.apiConfig/v1_0.toml- this file contains all the endpoints with their settings (open, secured and rate limit).
Snapshotless observers support
Instead of nodes that perform regular trie operations, such as snapshots and so on, one could use snapshotless nodes, which are, as the name suggests, nodes that have a different configuration which allows them to "bypass" certain costly trie operations, with the downside of losing access to anything but real-time.
A proxy that only needs real-time data (that is, they are not interested in historical data such as "give me block with nonce X from last month") are a very good use-case for snapshotless observers
Proxy snapshotless endpoints
Although there are more endpoints that can be used exclusively with snapshotless observers, here's a list with the most common ones:
/address/{address}: returns data about an address (balance, nonce, username, root hash and so on)/address/{address}/balance: returns the balance of an address/address/{address}/nonce: returns the nonce of an address/address/{address}/username: returns the username of an address/address/{address}/esdt: returns all the ESDT tokens managed by an address/address/{address}/esdt/{tokenIdentifier}: returns the token data of an address with a specific token identifier/address/{address}/nft/{tokenIdentifier}/nonce/{nonce}: returns the NFT/SFT/MetaESDT data of an address for a specific token identifier and nonce/address/{address}/guardian-data: returns guardian data of an address/address/{address}/keys: returns the storage key-value pairs of an address/address/{address}/key/{key}: returns the value of a specific key under an address/network/config: returns the network configuration/network/status/{shard}: returns the status of the specific shard/node/heartbeatstatus: return the heartbeat status of the entire network's nodes/transaction/send: broadcasts a transaction to the network/vm-values/int: performing SC Queries (gas-free queries) expecting the result as int/vm-values/hex: performing SC Queries (gas-free queries) expecting the result as hex/vm-values/string: performing SC Queries (gas-free queries) expecting the result as string/vm-values/query: performing SC Queries (gas-free queries) expecting the result as raw- and so on
Basically, every endpoint that doesn't require historical data access can be used with snapshotless observers
Dependency on Elasticsearch
Currently, Proxy uses the dependency to Elasticsearch in order to satisfy the Get Address Transactions endpoint.
In order to connect a Proxy instance to an Elasticsearch cluster, one must update the external.toml file.